You can try Parallels Desktop for free before purchasing by clicking this link and downloading our trial version
Use Github Actions to automate your CI/CD pipeline
Introduction
One of the most commonly used CI/CD tools is Github Actions. It is a powerful automation tool that allows you to build, test, and deploy your code from your Github repository. By default, you get access to 2000 free minutes per month for your Github Actions on Ubuntu machines. However, this number is reduced to 1000 minutes for Windows and 200 minutes for macOS machines. While the 2000 minutes are sufficient for most projects, larger teams might require more.
Fortunately, GitHub allows you to run your own self-hosted runners, which enables you to run your CI/CD pipeline on your own infrastructure. This is particularly useful if you have specific requirements that are not supported by the default Github Actions runners or if you have security concerns. Furthermore, you might have a large number of jobs that you need to run, and the free minutes are not enough.
In this guide, we will show you how to use our Parallels Desktop GitHub Action to set up your self-hosted runner on your Mac, Windows, or Linux Vms. This will enable you to run your CI/CD pipeline without any limitations and with no extra costs, all while maintaining the same level of security and isolation as the default Github Actions runners.
If you’re interested in learning more about self-hosted runners, then you can read more about them on the Github documentation.
Let’s get started!
Requirements
On this guide, we will show you how to set up one of our demo repositories. They are free and open to use, so you can copy the code or take inspiration for your own projects.
Install Parallels Desktop DevOps
Devops Service is a command line tool that allows you to manage and orchestrate multiple Parallels Desktop hosts and virtual machines. It will allow you to create, start, stop and delete virtual machines and will also allow you to manage the hosts that are running the virtual machines.
You can download the latest version of the Parallels Desktop DevOps Service by selecting the platform you are using and clicking the download button for the binary.
{% include inner-tabs.html data=”download_tabs” %}
Quick Configuration
By default the devops service will run with default values but these can be configured by creating a config.yaml file in the same directory as the binary. Below is an example of a configuration file.
to create a configuration file you can run the following command
touch /usr/local/bin/config.yaml
open -a TextEdit /usr/local/bin/config.yaml
You can then add the following basic configuration to the file, you can find more information about the configuration file in here.
environment:
  api_port: 80
  log_level: DEBUG
  ROOT_PASSWORD: VeryStr0ngPassw0rd
Start it as a service
We can also install it as a daemon to run in the background.
sudo prldevops install service /usr/bin/prldevops
launchctl start com.parallels.devops-service
This command will start the service, and the REST API can then be accessed at http://localhost:80.
{% include notification.html message=”To change the configuration you will need to stop the daemon before doing any changes.” status=”is-info” icon=”info” %}
Checking if the service is running
Once you started it you can then quickly check the health status of the service by either running the following command.
curl http://localhost:80/api/health/probe
or to go to the browser and navigate to the swagger page.
We also make available a Postman collection that you can import and use to interact with the DevOps Service. You can download it here.
Running the service as a container
You can find more about how to run the service as a container in the Docker documentation win the Getting Started section.
Install Parallels Desktop for Mac
After installing the DevOps service, we can use it to install Parallels Desktop for Mac by running this command:
prldevops install parallels-desktop
This will download and install the latest version of Parallels Desktop for Mac and install it on your system.
Step 2: Create a Builder Virtual Machine
To run our Actions, we need to create a builder virtual machine. This virtual machine will be used to execute the jobs that are defined in our Github Actions workflow. We have two options for creating the virtual machine - we can either use a pre-built virtual machine that we have created earlier, or create one from scratch.
Additionally, you will need to select the operating system (OS) that you want to use for your runner. The available options are Windows, macOS, and Linux.
You do not need to configure the virtual machine in any special way. You can use the default settings provided by Parallels Desktop. We will be adding the runners during the pipeline setup using a script.
For this example, we have created three virtual machines - one for each OS.
- Windows 11 ARM using the Parallels Desktop Wizard
- macOS Sonoma
- Ubuntu Server 22.04 LTS
Step 3: Create a GitHub Personal Access Token
Each runner needs to be registered with Github, and it is registered to each individual user or organization. To do this, we need to create a Personal Access Token.
- Go to your Github account settings
- Click on Developer settings
- Select Personal access tokens
- Select Tokens (classic) and click on Generate new token
- Add a name for your token in
note - Select the
reposcope - Select the
workflowscope - Select the
admin:orgscope - Click on Generate token
- Copy the token and save it in a safe place
Step 3.1 (Optional): Creating a Generic Ubuntu Server 22.04 LTS Virtual Machine Builder
In this example, we decided to be self-sufficient and not rely on any publicly available runners. To achieve this, we created a generic Ubuntu Server 22.04 LTS virtual machine and installed the action runner on it. We then registered the runner with Github and will be using it as our self-hosted runner to set up our Github Actions.
It’s worth noting that while this approach is optional, you can use any of the publicly available runners. But we wanted to demonstrate how to create and use your own runner.
Create a new Ubuntu Server 24.04 LTS Virtual Machine
- Download the Ubuntu Server 24.04 LTS ISO file from the Ubuntu website
- Open Parallels Desktop
- Click on the “+” button on the top left corner
- Select “Install Windows or another OS from a DVD or image file”
- Click on “Locate Manually” and select the Ubuntu Server 24.04 LTS ISO file
- Follow the installation steps
Install Parallel Tools on the Virtual Machine
Because this will be a command line only virtual machine, we need to install the Parallel Tools manually. To do this, we need to mount the Parallel Tools ISO file and run the installation script.
- Open the virtual machine configuration
- Click on the “Hardware” tab
- Click on “CD/DVD 1”
- Select “Choose an image file”
- Select the Parallel Tools ISO image from location Application > Parallels Desktop.app > Contents > Resources > Tools > prl-tools-lin-arm.iso
- Run the following commands on the terminal
for dev in /dev/sr0 /dev/cdrom /dev/dvd; do sudo eject $dev; done 2>/dev/null
sudo mkdir -p /media/cdrom0
sudo mount -o exec /dev/sr0 /media/cdrom0
cd /media/cdrom0
sudo ./install
and flow the installation steps.
You can also see a more detailed guide on how to install Parallel Tools here.
Install the Github Actions Runner
The installation process of the GitHub Actions Runner on the virtual machine can be facilitated by some scripts available on our Github repository
To install the runner, you can run the following commands on the terminal:
curl -o /home/install-runner.sh https://raw.githubusercontent.com/Parallels/prlctl-scripts/main/github/actions-runner/linux/install-runner.sh
curl -o /home/configure-runner.sh https://raw.githubusercontent.com/Parallels/prlctl-scripts/main/github/actions-runner/linux/configure-runner.sh
curl -o /home/remove-runner.sh https://raw.githubusercontent.com/Parallels/prlctl-scripts/main/github/actions-runner/linux/remove-runner.sh
chmod +x /home/install-runner.sh
chmod +x /home/configure-runner.sh
chmod +x /home/remove-runner.sh
/home/install-runner.sh -u $yourUsername -p /home
/home/configure-runner.sh -u $yourUsername -p /home/action-runner -o $yourOrganization -t $yourGithubPAT -n ubuntu_builder -l ubuntu_builder
Where:
$yourUsernameis your username used to login to the virtual machine$yourOrganization>is your Github organization or your Github username$yourGithubPAT>is your Github Personal Access Token
Check the Runner is registered and running
Once you have run the script, you can verify if your runner has been registered and is running by following these steps:
- Go to your Github repository.
- Click on the ‘Settings’ tab.
- Select ‘Actions’ from the left-hand menu.
- Click on ‘Runners’.
- Your runner should be listed there.
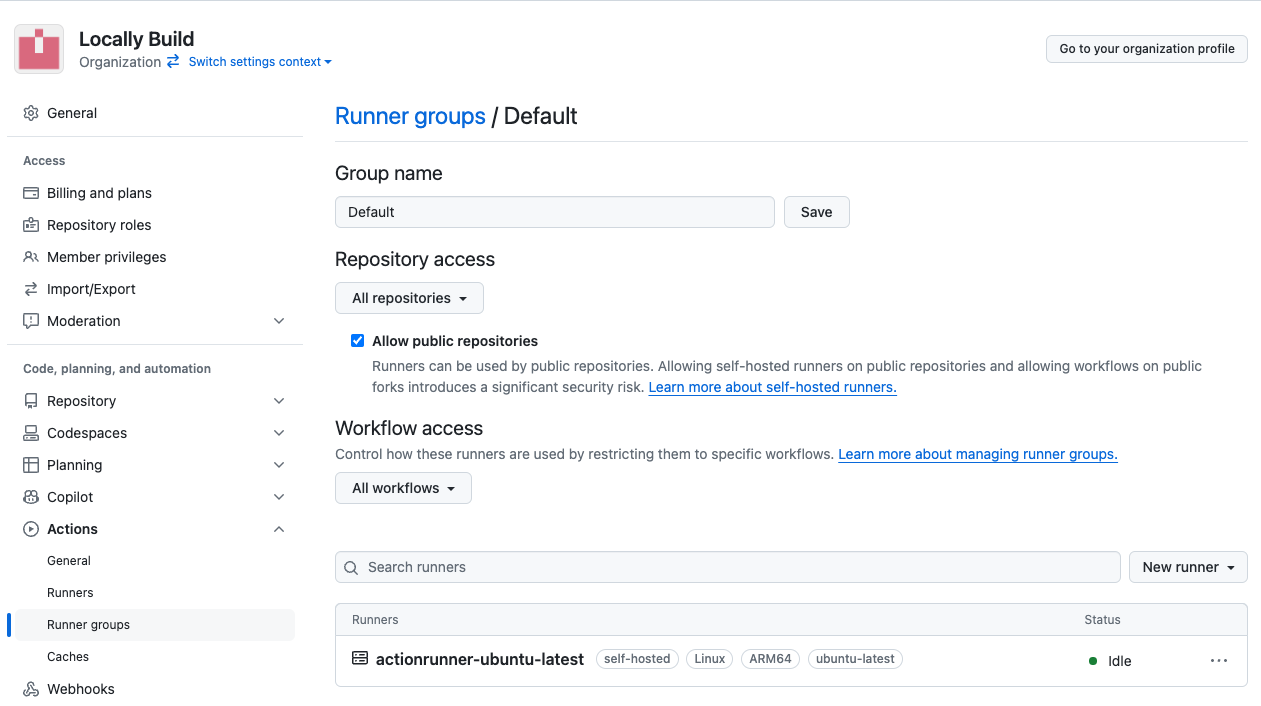
For example:

We should also ensure that our ‘Default’ runner group is configured to utilize all repositories, including public ones.
- Go to your repository on Github
- Click on
Settings - Click on
Actions - Click on
Runner groups - Click on
Default - Select
All repositorieson theRepository accessdropdown - Tick the
Allow public repositoriescheckbox - Select
All workflowson theWorkflow accessdropdown
Step 4: Creating our Github Actions Workflow
Now that we have our builder virtual machine and our personal access token, we can create our Github Actions workflow. On this example we will be using a MAUI sample project from https://github.com/dotnet/maui-samples and create a pipeline that will build the project.
We selected the Weather Sample Application called WeatherTwentyOne, you can find the repository here.
You can also find our repository with the Github Actions workflow here.
Create a new Github Actions Workflow
To create a new Github Actions workflow, you need to make a new file in your repository within the .github/workflows directory. You can pick any name for the file, but it must have the .yml or .yaml extension.
For instance, let’s create an iOS workflow. We’ll name our file build_ios.yml. In this example, we will add segments to the file and explain what each part does.
Secrets
To ensure security most of the services running here will use some sort of authentication and because the workflow is public we need to store the secrets in the Github repository and then retrieve them during run. To do this we will be using Github Secrets, these are encrypted variables that can be used in the workflow.
To add a secret to your repository, you need to:
- Go to your Organization or Repository on Github
- Click on
Settings - Click on
Secrets and variables - Click on
Actions - Click on
New organization secret - Fill in the name and the value of the secret, need to be on the format
YOUR_SECRET_NAME - Fill in the value
- Click on
Add secret
After this the secret will be available to be used on the workflow as ${{ secrets.YOUR_SECRET_NAME }}

Header of the workflow
This section defines what if the name of the workflow, when it should run and on which branches. we also define some environment variables that we will be using on the workflow. in this example this workflow can be triggered by a workflow call or manually by a workflow dispatch.
name: Build iOS App

on:
  workflow_call:
  workflow_dispatch:

env:
    DOTNETVERSION: 8.0.204
Job create-runner
The first job we will be creating is the one that will tell devops to clone the created VM and install the runner on it. This job will be running on the ubuntu_builder runner that we created before.
# this will be the jobs array that will contain all of our jobs
jobs:
  create_runner:
    # This will be the name of the job
    name: Deploy Self Hosted Runner
    # This job will be running on the ubuntu_builder runner self hosted runner
    runs-on:
    - self-hosted
    - ubuntu_builder
    # This will be the steps that will be executed on this job
    steps:
        # First we will be cloning the generic VM that we created before, in this case we will be cloning
        # a macOs Sonoma VM using our devops service, you can check the documentation on how to do this
        # in the official repository of the GitHub action
        - name: Clone VM
          id: clone
          uses: parallels/parallels-desktop-github-action@v1
          with:
            operation: 'clone'
            # The username to access the devops service
            username: ${{ secrets.PARALLELS_USERNAME }}
            # The password to access the devops service
            password: ${{ secrets.PARALLELS_PASSWORD }}
            # Set this to true if you are using a self signed certificate
            insecure: true
            # the host for the devops service
            host_url: example.com:8080
            # The name for the VM that we will be cloning
            base_vm: macOS_action_runner_builder
            # If we should start the VM after cloning
            start_after_op: true
        # This step we will be setting up the runner on the VM that we cloned
        - name: Configure Github Runner
          id: configure
          uses: parallels/parallels-desktop-github-action@v1
          with:
            # How many retries we should do if the operation fails on each execution
            max_attempts: 5
            # What will be the timeout after each failed attempt and before the next one
            timeout_seconds: 2
            operation: 'run'
            username:  ${{ secrets.PARALLELS_USERNAME }}
            password:  ${{ secrets.PARALLELS_PASSWORD }}
            host_url: example.com:8080
            insecure: true
            machine_name:  ${{ steps.pull.outputs.vm_id }}
            # These will be running some scripts we have created to install the runner in an automated way
            # you can copy this step and change only the secrets to use the scripts that we have created
            run: |
                curl -o /Users/install-runner.sh https://raw.githubusercontent.com/Parallels/prlctl-scripts/main/github/actions-runner/mac/install-runner.sh
                curl -o /Users/configure-runner.sh https://raw.githubusercontent.com/Parallels/prlctl-scripts/main/github/actions-runner/mac/configure-runner.sh
                curl -o /Users/remove-runner.sh https://raw.githubusercontent.com/Parallels/prlctl-scripts/main/github/actions-runner/mac/remove-runner.sh
                chmod +x /Users/install-runner.sh
                chmod +x /Users/configure-runner.sh
                chmod +x /Users/remove-runner.sh

                /Users/install-runner.sh -u ${{ secrets.VM_USERNAME }} -p /Users
                /Users/configure-runner.sh -u ${{ secrets.VM_USERNAME }} -p /Users/action-runner -o Locally-build -t ${{ secrets.GH_PAT }} -n ${{ github.run_id }}_builder -l ${{ github.run_id }}_builder
   # The GitHub action will output the ID and the name of the VM that we cloned, this will be used later on
   # for the cleanup job
   outputs:
        vm_id: ${{ steps.pull.outputs.vm_id }}
        vm_name:  ${{ steps.pull.outputs.vm_name }}
Job build-ios
This will be the job that will be building the iOS project, we will be using the runner that we created before to run this job. This can be different from project to project and this is just a over simplified version and should only be used as an example
  buildiOS:
    name: Build iOS App
    needs: create_runner
    runs-on:
        - self-hosted
        - macOS
        -  ${{ github.run_id }}_builder
    steps:
      - uses: actions/checkout@v4
      - name: Install the Apple certificate and provisioning profile
        env:
          BUILD_CERTIFICATE_BASE64:  ${{ secrets.APPLE_BUILD_CERTIFICATE_BASE64 }}
          P12_PASSWORD:  ${{ secrets.APPLE_P12_PASSWORD }}
          BUILD_PROVISION_PROFILE_BASE64:  ${{ secrets.APPLE_BUILD_PROVISION_PROFILE_BASE64 }}
          KEYCHAIN_PASSWORD:  ${{ secrets.APPLE_KEYCHAIN_PASSWORD }}
        run: |
          # create variables
          CERTIFICATE_PATH=$RUNNER_TEMP/build_certificate.p12
          PP_PATH=$RUNNER_TEMP/build_pp.mobileprovision
          KEYCHAIN_PATH=$RUNNER_TEMP/app-signing.keychain-db

          # import certificate and provisioning profile from secrets
          echo -n "$BUILD_CERTIFICATE_BASE64" | base64 --decode --output $CERTIFICATE_PATH
          echo -n "$BUILD_PROVISION_PROFILE_BASE64" | base64 --decode --output $PP_PATH

          # create temporary keychain
          security create-keychain -p "$KEYCHAIN_PASSWORD" $KEYCHAIN_PATH
          security set-keychain-settings -lut 21600 $KEYCHAIN_PATH
          security unlock-keychain -p "$KEYCHAIN_PASSWORD" $KEYCHAIN_PATH

          # import certificate to keychain
          security import $CERTIFICATE_PATH -P "$P12_PASSWORD" -A -t cert -f pkcs12 -k $KEYCHAIN_PATH
          security list-keychain -d user -s $KEYCHAIN_PATH

          # apply provisioning profile
          mkdir -p ~/Library/MobileDevice/Provisioning\ Profiles
          cp $PP_PATH ~/Library/MobileDevice/Provisioning\ Profiles
      - name: Setup .NET SDK  ${{env.DOTNETVERSION}}
        uses: actions/setup-dotnet@v1
        with:
          dotnet-version:  '${{env.DOTNETVERSION}}'

      - name: Install .NET MAUI
        shell: bash
        run: |
          dotnet nuget locals all --clear
          dotnet workload install maui --source https://pkgs.dev.azure.com/dnceng/public/_packaging/dotnet7/nuget/v3/index.json --source https://api.nuget.org/v3/index.json
          dotnet workload install android ios maccatalyst tvos macos maui wasm-tools --source https://pkgs.dev.azure.com/dnceng/public/_packaging/dotnet7/nuget/v3/index.json --source https://api.nuget.org/v3/index.json

      - name: Restore nuget packages
        run: |
          dotnet restore WeatherTwentyOne.sln

      - name : Build iOS App
        shell: bash
        run: |
          dotnet build -f net8.0-ios -c Debug /p:packageApp=false /p:buildForSimulator=true /p:ArchiveOnBuild=false /p:EnableCodeSigning=false

      - uses: actions/upload-artifact@v4
        with:
          name: artifacts-ios
          path: |
            bin/Debug/net8.0-ios/iossimulator-arm64/**/*.app
Job cleanup
This will be a job where we will be cleaning the VM that we created before, this will be running on the ubuntu_builder runner that we created before. we also add the if: always() as we want this to be run even if the pipelines fail allowing it to at least always try to clean up the resources.
  # This will be the id of the job
  clean_runner:
    # This will be an important step as it will allow the pipeline to always run this job
    # even if anything else fails, this allows for a better cleanup process
    if: always()
    # this will tell the job to run on last after both of the other jobs have finished
    needs: [buildiOS, create_runner]
    # This will be the name of the job
    name: Clean Runner
    # This job will be running on the ubuntu_builder runner self hosted runner
    runs-on:
    - self-hosted
    - ubuntu_builder
    steps:
          # This job will be removing the runner that we created before from the GitHub
        - name: Remove Github Runner
          id: configure
          uses: parallels/parallels-desktop-github-action@v1
          with:
            operation: 'run'
            username: ${{ secrets.PARALLELS_USERNAME }}
            password: ${{ secrets.PARALLELS_PASSWORD }}
            host_url: example.com:8080
            insecure: true
            machine_name: ${{ needs.create_runner.outputs.vm_id }}
            run: |
                /Users/remove-runner.sh -u parallels -p /Users/action-runner -o Locally-build -t ${{ secrets.GH_PAT }}
        # This will be removing the VM that we created before
        - name: Remove VM
          # We will also set the if: always() to ensure that this job will always run and the machine is removed
          # even if it fails to remove the runner
          if: always()
          id: remove
          uses: parallels/parallels-desktop-github-action@v1
          with:
            operation: 'delete'
            username:  ${{ secrets.PARALLELS_USERNAME }}
            password:  ${{ secrets.PARALLELS_PASSWORD }}
            insecure: true
            host_url: example.com:8080
            machine_name:  ${{ needs.create_runner.outputs.vm_id }}
Conclusion
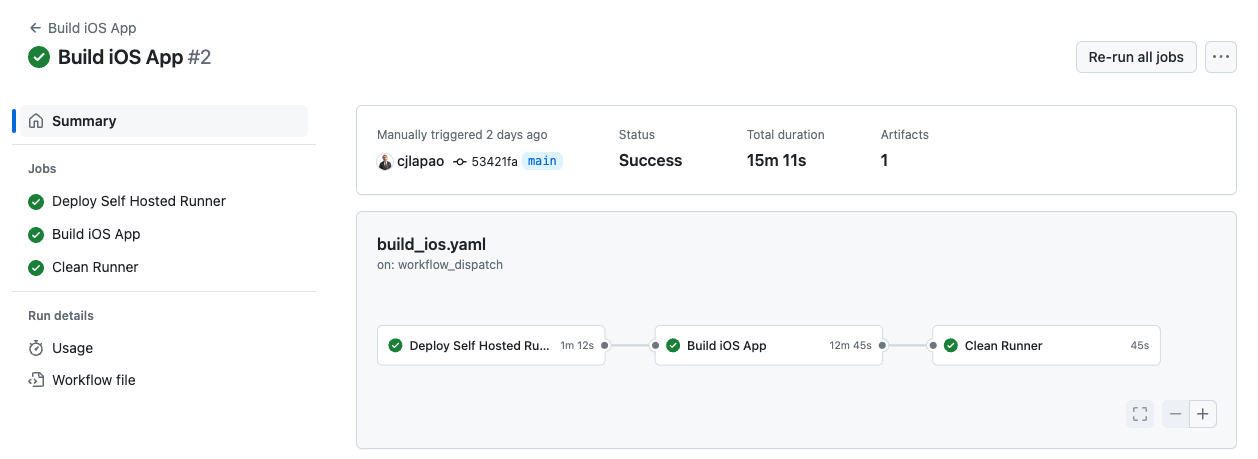
After you have gathered all the necessary files in one place, you can commit them to your repository and watch the workflow execute on your repository. To ensure everything is functioning as intended, you may examine the workflow logs.
It is worth noting that all of these steps will be completed using our Parallels Desktop DevOps Service and Virtual Machines. This allows you to run your CI/CD pipeline on your own infrastructure without incurring any additional expenses, while still maintaining the same level of security and isolation as the default Github Actions runners.